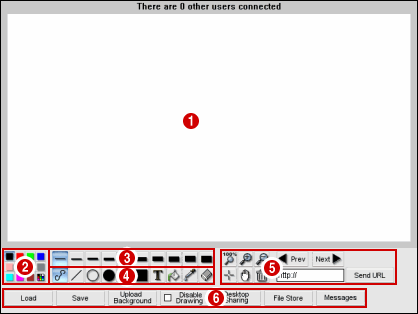

| The drawing canvas of the whiteboard. Hold the left mouse button down to draw onto the canvas. If other people are connected to the whiteboard, you will see them drawing in real-time. The size of the whiteboard is set in the options file on the server (e.g. groupworld/data/config/bp1wb1.opt is the options file for the button panel whiteboard). | |
| Click on the drawing colour you want to use. | |
| Click on the size you want to use. This will be the pen size for lines and unfilled shapes, and the font size for drawing text. | |
| Click on a button to change the current drawing mode: | |
| Extra tools: Prev/Next (optional) - cycles through the png/jpeg images that have been uploaded to the whiteboard (through the Upload Background function. The images are cycled through alphabetically. The Prev and Next buttons only appear if the presenter option has been set to true in the options file for the whiteboard. Send URL (optional) - Type in a URL, then press the RETURN key or click the Send Url button to open up the web page on the other users' displays. The Send Url button only appears if the show_send_url option has been set to true in the options file for the whiteboard. | |
| Click on a button to activate that function: Load - allows you to load a previously saved picture, or a jpeg/png background image. Save - allows you to save the current picture. If the filename you enter ends with ".jpg", ".jpeg" or ".png", the picture will be saved as a jpeg or png file. Otherwise it is saved in a custom vector format. Upload Background - allows you to upload jpeg or png images which can then be set as backgrounds. Note that this button is only displayed if you have upload permission. Disable Drawing - click this button to prevent any other users from drawing onto the whiteboard. Note that this button is only displayed if you have "disable interaction" permission. When you click this button, a window appears showing who can draw. You can click on a user's name to allow only that user to draw. Desktop Sharing (optional) - clicking this button enables the desktop sharing function. Your computer desktop image will be sent to the other users in real-time, allowing you to demonstrate applications. The other users will just be able to view your desktop and your mouse pointer; they will not have any control over your desktop or your computer. The Desktop Sharing button only appears if the show_deskshare option has been set to true in the options file for the whiteboard. File Store (optional) - clicking this button brings up a file store, allowing you to upload and download files. This button only appears if the show_filestore option has been set to true in the options file for the whiteboard. Messages (optional) - clicking this button brings up a bulletin board, allowing you to read and post messages. This button only appears if the show_msgboard option has been set to true in the options file for the whiteboard. Chat (optional) - clicking this button brings up a chat window, allowing you to chat to other users. This button only appears if the show_chat option has been set to true in the options file for the whiteboard. Record (optional) - clicking this button starts recording the session. Ths button only appears if the show_record option has been set to true in the options file for the whiteboard. | |